
Release Notes for Cases Module
We're enhancing the Customer Service capabilities by introducing a Kanban board for cases. Support managers can use the board to monitor the performance of their teams. Service representatives can use the board to manage their cases and move cases forward easily.
Kanban for cases
The case statuses are displayed in the columns of the Kanban board, grouped by their associated actions as defined in Administrator. The first group contains the status that are not available in Assign Case, Escalate Case and Resolve Case dialogs. The second group (blue columns) includes statuses available in the Assign Case dialog. The third group (orange columns) includes statuses available in the Escalate Case dialog. If a status is available in both the Assign Case and Escalate Case dialogs, it will be displayed in the third group. The fourth group (green columns) includes statuses available in the Resolve Case dialog. If a status is available in all three dialogs, it will be displayed in the fourth group.
In Cases module, you can create new cases and filter cases by creation dates, assigned users, priorities, and case types. Cases are displayed as cards. The status of a case can be changed by moving its card to a different column. Alternatively, you can drop it into one of the buckets in the Action Bar located at the bottom of the screen. The Action Bar will appear when you are moving a card.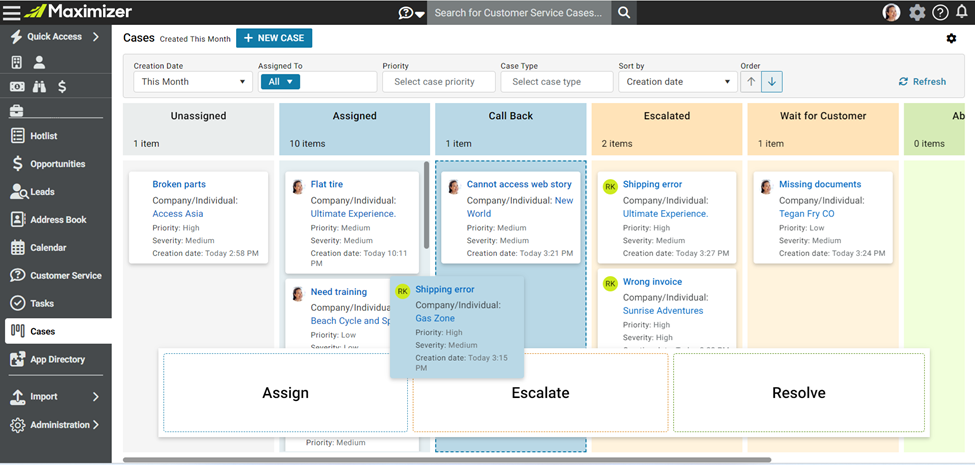
In each card, clicking the case subject opens a pop-up to view the case details and timeline. Similarly, clicking the Address Book entry name opens a pop-up to view its details and timeline. Within these pop-ups, you can edit the entry or perform actions related to the entry.
The actions in the board are affected by access rights and system settings.
- If the logged-in user doesn't have access to the Customer Service module, the Cases module will be hidden.
- If the user doesn’t have the rights to create cases, the New Case button will be hidden.
- If the user is not allowed to modify cases, a message will appear at the bottom of the screen informing them of this restriction. They won't be able to move cards to another column.
- If the system settings disallow direct changes to status (if 'Do not allow direct changes to status (Actions only)' is ticked under Administrator > Preferences > Customer Service > Options tab), cards can't be moved to another column. However, they can be dropped into a bucket in the Action Bar, which will open a pop-up for assigning, escalating, or resolving cases.
Customize the layout for cards
Different users need to see specific data in the cards. For example, a support manager wants to see the age of cases, while a support representative wants to see the follow-up deadline. Users want the ability to customize which fields are displayed in the cards.
You can select up to 6 fields to display in the cards. To customize the layout, click the gear button to open the dialog showing all available layouts. There is a default layout which includes the following fields: Subject, Company/Individual, Priority, Severity and Creation Date. You can create new layouts and share them with your colleagues.
To create a layout, click New Layout button. In each layout, the first field is always Subject, which cannot be removed or repositioned. You can then add up to 5 new fields. These fields can be repositioned by drag and drop. They can be deleted.
You need to enter a name for the layout and specify security rights. Other users can see and apply your layout if they have the Read Access right. They can edit or delete your layout if they have the Full Access right.
You can create multiple layouts and select one to apply to the cards on the board.
Sorting cards
By default, the cards in a column are sorted by creation dates. People in different roles may want to sort the cases differently. For example, support managers might want to sort cases by priorities so they can see the most critical one first. Support representative might want to sort cases by follow-up deadline. Now, you can select a field for sorting and change the sorting direction.
Note that the items available in the "Sort by" drop-down match the fields in the layout currently applied to the board.
Refresh the board
Click the Refresh button to refresh the board and see the updated data.